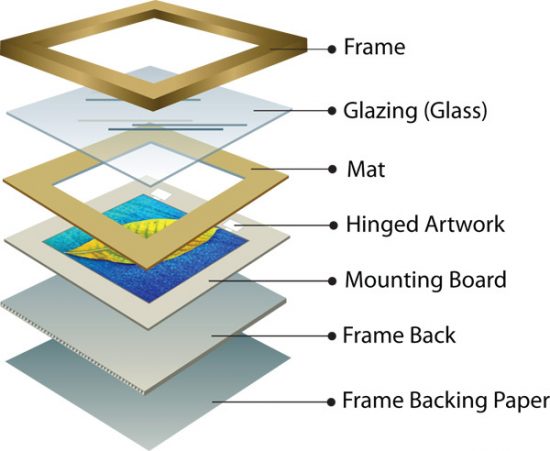
Hanging art is a delicate balance between you, the strength of your wall, and the valuable object you are about to place several feet above the ground. We’ve all experienced the moment of dread when we hear the crash after the work has fallen from the mounting on the wall and think to ourselves, “Great, time to see the damage.” All of which can be avoided if the proper supplies are used, and your wall is sturdy of course.
Luckily, there are several things we all instinctively do when we hang works on the wall which are correct. These range from measuring the distance from the ground we want the work to hang on (universally around 5 feet, 2 inches as that is median eye level) to making sure our nails and/or brackets are horizontally even so the work doesn’t seem tilted to strategically placing the nails and/or screws on a stud. All of these are proper hanging techniques, but here a few more tips we use at the gallery.
The first set of tips revolve around the bolts/screws/nails/hooks themselves, with the most important being to always use two bolts/screws/nails/hooks for any work you hang no matter the size; and when more than ten pounds of weight is involved then a molly bolt is recommended. A molly bolt usually consists of a pointed end, which is used to help insert the bolt, the bolt or screw itself and the anchor.
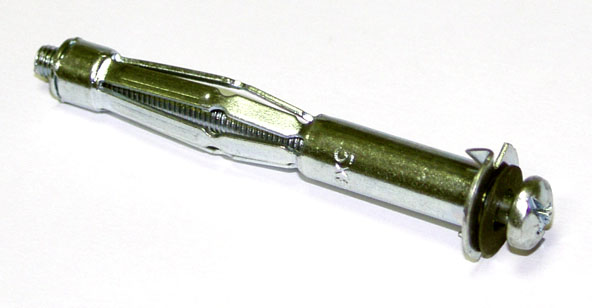
The anchor is a sleeve that fits around the bolt and is threaded, so it expands as the bolt is tightened. It just provides some extra support for the weight of the work. Nails are fine to use, but screws and/or bolts should ideally be used as they are drilled into the wall which provides for little wiggle room that hammering a nail often creates in the drywall.
After the correct supplies are chosen, which depends on your preference and weight of the work, the process begins. This is where the importance of measurements cannot be stressed enough. No one likes the feeling of screwing in a bolt and realizing when the work falls or won’t fit in the desired spot that the distance they measured on the wall was wrong. Therefore to avoid the frustration, always measure the hangers on the back of your work and then transfer the measurements to your wall, leaving a mark with a pencil or tape.
Tape, especially masking tape, is handy for after the hanging if you want to tape around the nail/bolt/screw and hanger to provide extra assurance and support. As the work often gets mismanaged in the hanging process, do make sure to always support the bottom when hanging so the work does not drop. The last bit of advice would be to rotate works on display so they do not get damaged by elements such as light. When everything is done right there will be no accidents or crashes, and you and the artwork can rest easily knowing everything is secure. Happy hanging!